Thursday, April 29, 2010

MIA...yup, I Know, I Suck!

Hey Ladies!

I'm sorry I have been basically MIA this week!

Things are just ridiculously busy.  My only free time that I have to post is when I get to work early, or during lunch.  Sadly I havn't even had that the past week.  And I'm not sure I'll have much time next week either!

We are changing to a whole new billing system at work, and the deadline for completion has been moved up to June 1st.  This is so far past ridiculous I don't even know what to call it.  Every bit of info on our current system has to be input, by hand, in our new system.  Thank the Lord Mom will be helping me!  Only other problem...this system is 100% totally not even close to similar to the system I've been using the past 6+ years!  AND I just opened it for the first time a week ago!  JOY!!!  To say I'm stressed is about the understatement of the year!

So yeah, I am gonna do my best to get a few posts typed up and ready to go this weekend.  That way I just gotta hit "Post" and you'll have something!

Hope you ladies understand and dont abandon me! 


Talk to you soon!

Tuesday, April 27, 2010

The Past Few Days

Good Morning Lovelies!

Sorry I was absent yesterday!  I just didn't have it in me, nor did I have the time, to do a post.  Actually I'm slammed right now, but I am trying to get this cranked out, a bit at a time. 

No nails today, sorry!  But I figured I'd share a bit about what's been up since I last posted!

I was surprised Thursday afternoon by this prettiness:
Than of course, I had to have fun and take a few macro shots.  
I really like how they turned out so I thought I'd share!


I LOVE Macro!  So much fun!


Friday I got up at 2am...yes, you read that right, 2am!  I have decided 2am is not my friend, nor is it a good time to be getting up for the day!  ANYWAY...we got up, got washed and dressed, and met my father-in-law in town and jumped in the truck and headed up the highway.  I slept, alot, cause I knew I'd be a bundle of nerves the whole way back, watching the load!  We got to the place we were picking the Milling Machine up from.  Rob went in with the paid invoice, like he was supposed to, and I waited outside, for him to come back and tell me it was time to get to work!  15 minutes passed....then 25.....then 35....and just when I was abotu to barge in and demand to know what they had done with my husband, here he comes out the door with a grin on his face.  "Hmmm...what is going on" I'm wondering.  Turns out God was gonna bless us enormously!  After being told by multiple people, prior to arriving there, to be sure we had everything we would need, cause they wouldn't so much as touch it to unplug it if it needed to be...a few guys decided to go ahead and just get a fork truck and set it on our trailer for us!  WOOOHOOO!  What a huge blessing!  it would have taken hours to get this thing out to the trailer and loaded with just a palette jack!  
After strapping it down with ever strap we own, I decided we needed to go to the Lowe's at the end of the street(talk about convenient!) and buy 4 more to make me feel better!  I snapped a few pics to show you the final strapped down machine!
It's about 7 feet tall!
It's so funny!  It looks to tiny in these pics!  It's totally not. 
The trailer it's sitting on carries our BIG racecar!
That might help the proportions a bit!

So yeah, I stared out the back window of the truck, watching that machine until it got too dark to see anymore!  Talk about stress!  I swear, I am SHOCKED I didn't wind up with an ulcer or a heart condition.  Watching that thing bounce (the whole trailer was bouncing) on the craptastic NY and Pennsylvania roads was totally nerve wracking!  But we marked the trailer and everything so we could check and see if it moved at all, and it only moved a total of a 1/4 inch!  
Saturday was much more relaxing!  We ran down to my inlaws and washed and gassed up the truck, to return it to our buddy we borrowed it from.  Then hung out at mom's a bit, to visit with her and my sister who was home for the weekend from college.  Then we sorta re-created our first date to celebrate our anniversary.  Went to the Thai restaurant we went to that first time, then went grocery shopping, lol, nope, didn't do that on our first date!  but we finished up with icecream from Cold Stone, just like we did that first time!  It was fun!

Sunday was stress city again.  This time we had to move this behemoth from the trailer to the garage, and get it off that plastic palette!  There was much disagreement on how things should be done, many scary "it's tipping toward (insert name)!" moments, lots of straining and muscle use, but it got done!  With the help of 2 very awesome friends.  So it's in its home and ready to make us money!

That, my friends, was quite a few days!
I'm worn out just typing it all!
I need a weekend to recuperate from the weekend!

That's it for today my wonderful readers!  I'll be back tomorrow with the mani I sported for our Anniversary (I let Rob pick!)

I hope you have an awesome day!

{{{HUGS}}}


Thursday, April 22, 2010

Nails, a Special Day, and a Trip, OH MY!

Good Morning Lovelies!

I have lots to share with you today! 


First I wanna say a HUGE thank you to every who suggested things for me to try yesterday!  I am gonna use them ALL!!!  LOL  Then my toes will be indestructible!!!  MUAH HAHAHAHA 

ahem, ok....
On to the mani!

This idea actually popped in my head while we were lifting, oddly enough!

I started with Orly "Gorgeous" which Rob picked out for me, as a base.  It was 3 coats I think.  It's a purple toned magenta with a TON of blue flash!
Next, using Sally Hansen Insta-Dri in "Blazing Blue", a shimmer dark blue, I stamped the bead looking tip design from M62 diagonally across the bottom half of the nail, making sure one end went right to the bottom corner (you'll see in the pic)
Then I used the top row of beads as a guide and painted from there up with OPI "Ink".

The next day I was looking at it and thought it would be nice if that blue shimmer continued the whole length of the nail!  so on top of Inky I added 1 coat of NYC "Purple Pizzazz Frost" a purple with a TON of blue flash!  I tried and tried to get the blue flash to show in good lighting and couldn't.  so here is a dark crap-tastic pic of it!


Next.....

Today isn't just Earth day...it's my Anniversary!  So I thought I'd share a few pics from the wedding day!  Don't laugh, this was before I got good at makeup, and lost weight!


This pic bring so many memories back!
First, it's so weird to not see my chest/shoulder/arm covered in flames, LOL
Next, if your very perceptive, you will notice a bandaid on my index finger!  
Little story:
2 days before the wedding, me and mom bought all the food for the reception, brought it to our church and used the kitchen to cook it all.  Yes, I made the food for my own wedding.  I also made the cake, well cupcakes.  (after the massive multi-tier one i made for my first marriage, I was going easy this time!)
I was chopping bell peppers for a pasta salad with mom's nice sharp knife, talking away to her (she's my bestest friend, well her and rob and my sister, but she's be my bestest friend the longest!)  and I took my eyes off what I was doing for a brief second and BAM pain!  I look down and wow...I had almost entirely taken off a quarter of my finger along with the nail!  I went back and forth between, wow, this looks WAY worse than it feels(thank God for sharp knives), but no stitches!  and CRUD now I cant do anything nice with this nail and I'll have to wear a band-aid!  BOOO
yes, I thought about the fact I wasn't gonna be able to do my nail!
After much pressure and many refusals to go the the hospital, if finally quite bleeding, and we got back to work!

Fun times!

Next!
I get to get up, get ready and be on the road at 4am tomorrow!  oh joy!
We are driving up to Highland New York to pick up a Milling machine we bought for our company. 
We are driving there, loading it up and driving back.  so it's gonna be a long LONG day!
Not to mention the fact that we aren't 100% sure how to manhandle it onto a palette jack, since, ya know, it only weighs 3,000 pounds!  We might be strong, be we ain't THAT strong!
So due to this, no post tomorrow!

So I hope you all have a FABULOUS weekend!

{{{HUGS}}}


Wednesday, April 21, 2010

A Little Help From My Friends!

Good Morning Lovelies!

Today I am here to ask for some help, or advice, or ideas, or anything!

Here's my problem....

My pedicures are suddenly chipping after 1 day of wear!

Yes 1 stinkin' day!

Even a franken of all glitter I made a while back, that lasted me 3 weeks with no chips once, chipped day 1!

Now, before you jump in and help me out, here are the things I have done already to help this situation:

- Made sure to wipe toe nails with pure acetone before beginning polish, to remove any residue that may be there from lotion or something.
-Washed toes with warm soapy water and thoroughly dried them before polishing.
-Added a base coat (never needed one before) Base coats used:  Borghese, China Glaze "Super Adhesion", Diamond Cosmetics "Super base".

-Trimmed nails shorter (virtually no free edge) thinking it might be rubbing against my shoe, even though I wear socks!
-Even roughed up the surface of the nail(no I didn't go crazy, just took off the shine) with a file to help polish stick better!

HELP!!!

I LOVE wearing glitter pedis but taking it off every night is just not gonna work for me! 

Anyone know any tricks, or miracle products?

I've never had issues like this and it is driving me MAD!
I mean I used to be able to wear no socks in sneakers for days and lots of walking before I'd get "tip wear"


Thanks for the help everyone!


{{{HUGS}}}

Tuesday, April 20, 2010

A Holo Konadicure for Scandalous!

Good Morning Lovelies!

Today I am gonna show you yet another idea that came from my plea for ideas months ago!

My fellow Vixen and queen of the holo, Scandalous, requested I do a holo design.

So, I thought, I'll take that idea and run with it!  I'll do a holo on holo design!  WOOHOO.

I started with 2 coats of  Diamond Cosmetics "Chainmail Charm".

Then I decided to stamp over it with China Glaze "OMG"...problem was, I couldn't pick a design.  I asked Rob what he liked better, and he picked the opposite of the way I was leaning...So I did 1 on my left, and 1 on my right!  I shoulda listened to him, his choice came out better!  oh well.

Note!  The sun washed these pics out terribly, so I darkened them a bit in Photoshop.  Problem is, they came out a touch too dark.  grrr...
my pick   Konad plate M65 (sorry about the chip)


Rob's pick  Konad plate M63.


Well, That's it for today my dears!

Hope today is wonderful for ya!

{{{Hugs}}}


Monday, April 19, 2010

Pink and Smoky Purple Evil Shades Look

Good Morning Lovelies!

Today I thought I'd share an Evil Shades look I did last week.

First I gotta say, that Evil Shades Shadows blend so well it's ridiculous!   I wore this look the first time the morning I woke up to no power!  I put my makeup on by the light of the flashlight feature on my cell phone!  Once I got to work, I went to the bathroom to look in a mirror bracing myself for the horror I knew I would see.  I mean it looked fine at home, but how good could in-the-dark-application possibly look in decent light?  I was FLOORED!  It looked awesome!  To me this is a huge testament to just how awesome Evil Shades is...you can put it on in the dark and it still ROCKS!

Anyway, I loved the look so much I redid it the next day so I could take pics and share!

I started by applying concealer all over the eyes.  Both on the under eye area, as well as the upper lid to the brow, inner eye area and lower lid.

Then I applied Urban Decay Primer Potion to the entire upper lid area as well as along the lower lash line and inner corner of the eye.

Next, using a wide, flat brush, I applied Cheshire along the lower lash line and extended it up(just continue the angle of the lower lid), halfway between the outer corner of my eye and the outer edge of my brow.  Then using a fluffier brush I applied it in the crease area, blending up and out to soften the line I had previously made.  Lastly I used a small pencil brush to apply Cheshire to the outer half of the upper lid at the lashline.  I made this line very thick at the outer corner and got thinner as I went in. 

Next I applied Suffocation to the my lid, from lashline to cease.

Next I applied a matte white shadow to the inner eye area and just below the brow and blended that down.

I topped the whole thing off with a fine dusting of Moonlit, applying it heaviest at the inner corner and just under my brow.

I added black liner and mascara, of course.
Applied my foundation.
and finished the look with Evil Shades LipStick in Bane!
I'm sad that my camera refuses to capture the gorgeous blurple flash that both Suffocation and Bane have!
It also didn't pick up the pretty sparkliness of Moonlit!


That's it for today my lovelies!

I hope you have a great day!

{{{HUGS}}}

Friday, April 16, 2010

Spotlight on Evil Shades Cosmetics!


Good Morning Lovelies!

I'm sure many of you know my dear friend Evil Angel and her awesome blog Black Nail Polish and Lip Gloss.
But I think alot of people don't realize that she owns her own cosmetic company, Evil Shades Cosmetics!
I have placed a few orders for products and want to show you what kind of goodies you can get over at Evil Shades!
BUT before I start out, I want to make sure that everyone knows, while do consider Evil Angel a good friend, my opinion of these products is 100% honest, and not at all influenced by our friendship.  If I don't like something, I'm gonna say it!  I know she would want me to be honest as well!  So here we go!
First up, the eyeshadows:
Click to make this HUGE so you can see all the gorgeous colored shimmer!
Colors from left to right are:
Double Barrel: a gorgeous gunmetal with a multi color shimmer.  This is wicked awesome!
Cheshire: an awesome almost smoky purple with a pink shimmer! This is my go to purple for my daytime smoky looks now!
Abyss: blue-grey purple with a blurple shimmer!
Banshee:  bright aqua/teal with a silvery shimmer!
Panic: coral-pink with a faint pink/purple shimmer
Suffocation: purplish pink with a strong blurple shimmer!  LOVE!
Moonlit:  sparkly shimmery white!  My go to highlight color now, for brow bone and inner lid, right at the tear duct!  Really brightens your eyes!

Now...cause that pic of Moonlit SUCKS, here's a better one:
the light kept washing out the shimmer, but it shows PERFECT in this dark pic!


Now...Lipglosses anyone?
These ROCK!

Venom
Thin application:
Such a pretty sparkly shimmery black gloss!
Wait til you see this over Devilista!


Guilty As Sin
Thin application:
This gives such a nice subtle pink tint and sparkle!
LOVE


Deadly
Thin Appication:
Gorgeous!
Sparkly red!
Love!


And now the lipsticks!!!
These are amazing!  SO creamy, not at all sticky or greasy!
And they smell divine!  Like fruity candy!

Bane
Ok, now here's the thing.  My camera hated me the day I took the swatch pic, and did not in the slightest, show this color anywhere near correct!  So I chose not to show the pic.  Instead, go HERE to look at Evil Shades pic!  It's WAY better!
Bane ROCKS
It is my absolute favorite lipstick ever!
It's this gorgeous slightly purplish pink with this ridiculous blurple shimmer to it!  
Seriously, go buy it now if you like it, cause very soon I'll be buying a metric ton of it, to make sure I NEVER run out!

Devilista
AHHHH!!! GORGEOUS!
This my friends is my favorite red EVER!
do you have any idea how many red lipsticks I've bought, brought home, put on, and thrown in a drawer, never t be worn again, cause they looked TERRIBLE on me?
ALOT!  a whole lot!
I complained about a lack of near neutral reds to Evil Angel.  It always seems reds are too orange and clash with my olive tones, making me look half dead, or so blue toned they are basically dark pink.
HOURS later, she unveiled this!  
And it's PERFECT!
If you like red I HIGHLY recommend this!

Now...wanna see something awesome?
LOOK!
This is Venom gloss over Devilista!
How ridiculous is that!
You can add even more gloss (this is a thin coat) and it makes it this gorgeous dark vampy red!


Seriously, if you have even one little hesitation in ordering, just ignore it!  Her customer service is incredible!  Even before she knew who I was, and I placed my first order, she had it sent out hours later!  This girl ROCKS!  And check out how you get your product!
Open your mailer, and you find this awesome bag inside, loaded with your goodies and a yummy lollipop for you!

I also forgot to mention, not only is all of her product totally 100% cruelty free, but it's also almost entirely vegan (just a few products are not)!

So yes, RUN, don't walk, to Evil Shades, and get some AWESOMENESS!!!

I hope you all have a wonderful weekend!

{{{HUGS}}}

Thursday, April 15, 2010

Color Club Pardon My French Collection Review

Good Morning Lovelies!

(note: I remembered my notes today, so coat count will be correct, however, I got 2 wrong the past few days, 1 from BB Couture and 1 from OCC.  OCC "Rhythm Box" was actually 3 coats, and BB Couture "Hot Spot'" was actually 3 as well.  I will update the post appropriately) 

Today I have the Color Club "Pardon My French" Collection!
(Click for big pics)
Doesn't it just scream Spring!

This collection consists of 4 creams and 3 coordinating glitter polishes for layering or wearing on their own.
I decided to swatch each glitter top coat over each color, that way you can see all the possibilities.

Let's get started!
Pardon My French
 
Pardon the flaw in the index nail, Yes, I apparently HAD to stuck my finger in it!  GRRR
In the bottle I was not impressed with this color.  But on the nail, I LOVE IT!
Such a nice soft slightly nude pink.  It's not chalky at all, which is great!
This is 4 coats.

Now lets see it with the glitters!!!
Left to Right:
Hot Couture, Turn the Other Chic, and Si Vous Please!
1 coat each


I Believe in Amour
Yes!  LOVE IT!
Lavender toned pink!
Again, not chalky at all!
This is 4 coats, HOWEVER, 3 coats would have worked just fine.  See I have a problem applying polish with my left hand.  I almost always have to add an additional coat to my right hand, do to the left not allowing me to apply smoothly.

With Glitter:
Left to Right:
Hot Couture, Turn the Other Chic, and Si Vous Please!
1 coat each


Oh Naturale
Shockingly, this actually looked decent with my skin tone!  
Peachy Oranges never do, but this did!
Again, like all the others, not chalky at all, this one was almost jellyish.
3 coats.

And with Glitter:
Left to Right:
Hot Couture, Turn the Other Chic, and Si Vous Please!
1 coat each
This glitter on this color really can make it way different.  
2 coats of Hot Couture would have made it more pinkish, a blush peach color.


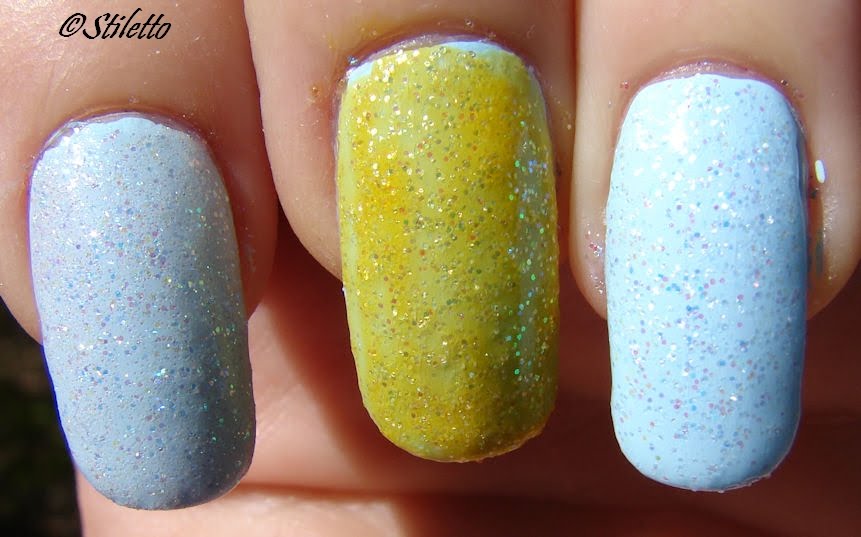
Take Me to Your Chateau
LOVE!
Gorgeous bright, yet soft, sky blue!
This was the resounding favorite of the collection for me!
This is only 2 coats, but again, had I been applying with my right hand, I actually think I could have gotten away with 1!

Now with Glitter:
Left to Right:
Hot Couture, Turn the Other Chic, and Si Vous Please!
1 coat each
Yeah, Turn the Other Chic...not so much a good idea.  LOL
BUT!  Check out Hot Couture...The slight pink tint that that glitters base has starts leaning it to a periwinkle color!  I think 2 coats of Hot Couture woulda resulted in full on periwinkle gorgeousness!
Now, Lets take a closer look at the glitters:
Left to Right:
Hot Couture, Turn the Other Chic, and Si Vous Please!
 (yeah, not sure how I managed to switch the order for this pic!)

Let's look at the glitter on a bare nail!:
This is 1 coat of each.


2 coats.
Left to Right:
Hot Couture, Turn the Other Chic, and Si Vous Please!
Closer view for more detail!
You can see that Hot Couture's pink base definitely shows up, which is nice, since it will transform the color of the base coat of polish!  Kinda like frankening without the mixing!  LOL  So all you ladies scared to fraken, here ya go!
Turn the Other Chic I actually prefer on it's own, with no base polish.  I like the jelly quality! 
Si Vous Please! is just lovely, I gotta thing for blue/pink/purple iridescent glitter!

All in all I LOVED this collection.  The creams are gorgeous and creamy and not at all chalky.  The glitters are fun do to the color change they impart on the base polish, and it's nice they work on their own!
The only thing that bugged me a bit was the consistency of the glitter polish.  It was almost like a gel.  Not SUPER thick and unmanageable mind you, but not drippy like regular polish either.  I think if I add a few drops of thinner, it should make it all better.

Now...wanna see something cool?

When I did the swatching, I'd put 1 cream on each hand, and go out back on the back deck to take pics.  I brought the glitters out there with me, so I could slap a coat on right there and snap the pic, less likely for me to bang it into something on the way out the door that way! 
Well I had them all sitting on the railing, and I had a visitor.
He sat there and hovered around the bottle and landed on it and crawled all around it.  And he couldn't for the life of him, figure out how to get to this bright, juicy, sparkly flower!
He wouldn't LEAVE!  He was seriously obsessed, it was funny!

Oh and this is a carpenter bee for those who are curious.  I do not like them, they bore holes in my house(I live in a log home for those who do not know), then the giant woodpeckers(not the little guys, these guys are like a foot and a half tall!), who think these guys are delicious, come and peck and destroy my home trying to get rid of them!

Dear Mr. Bee, 
While my house is wood, it is not a tree.  Please make your home in the trees.  Not only would it make me happier, but then you could bore deep enough that the woodpeckers couldn't get you!
Please consider moving to one of the eleventy billion trees surrounding my house.
Kthanksbye!


That's it for today my wonderful ladies!

I certainly hope you have a great Thursday!

{{{HUGS}}}